Many fish die during transportation from their natural habitat to the pet stores, and even more, die before they reach customers’ homes. According to WWF, the case is more severe with sensitive saltwater fish, with about 80% dying before enjoying a stay in a new aquarium.
Shock due to sourcing & transportation handling is the most common cause of fish death. Transportation also affects the transportation bag’s pH, ammonia, nitrate, nitrite, C02, and oxygen levels. This is where fish acclimation comes in.
Acclimating a new fish into your aquarium tank is an essential process to ensure the health and wellbeing of the fish. It prevents shock and stress that can arise when the fish is put in a different environment with drastically varying water qualities. Failure to acclimate a new fish correctly can lead to illnesses and even death.
In this article, we will discuss in-depth the acclimation process for fish, including the duration of acclimation, various methods for acclimating fish, and all the essential steps you need to take. Consider this a complete guide to fish acclimation in your aquarium.
What Is the Acclimation Process in Fish?
Fish acclimation (also called acclimatization) is the process of gradually introducing a new fish to the environment of an aquarium tank. This process helps the fish adjust to the water chemistry, temperature, and other conditions (pH, salinity, nitrate, ammonia, nitrite, salinity, etc.) of the aquarium.
When fish are transported from one location to another, they are exposed to varying water chemistry along the way. Fish from a pet store comes from a tank with specific water conditions; it is then exposed to varying water chemistry in a bag during transportation and then is placed in a new environment when it reaches the destination.
Acclimation allows the fish to adapt slowly to these varying changes, reducing the likelihood of stress and shock.
Improper fish acclimation is sometimes thought to be the cause of death for new fish in an aquarium. However, this is rarely the case since poor acclimation is a slow killer of fish, not a rapid cause.
If you buy a fish and it dies suddenly or overnight in your tank, then the biggest contributor is not poor acclimation but most likely other factors. Poor tank conditions (like high ammonia, nitrite, nitrate, etc.) caused by poor acclimation are bad, but they are slow killers with gradual negative effects.
Stress can rapidly lead to death or illnesses in a new fish only if the fish is also affected by some of these severe causes:
- Shock-induced rapid death due to transportation handling.
- A chlorine pulse is due to huge water changes with chlorinated water.
- High Carbon Dioxide or low oxygen due to huge water changes.
- Bacterial infections like Aeromonas and Columnaris, especially for new tanks with lots of bacteria and improperly quarantined fish.
- Asphyxiation due to a power outage that affected electrical components like the heater.
Shock-induced deaths are among the biggest, most rapid killers of new aquarium fish. If your fish dies overnight or suddenly after you get it from the store, and you acclimated the fish properly using the recommended methods, then the cause of death is more likely the above-stated factors.
In other words, fish acclimation does not prevent fish death in an aquarium but rather helps the new fish transition smoothly into the new environment with minimal stress, thereby reducing the effects of other factors that may hinder its wellbeing.
Another important aspect after acclimation is quarantine. Quarantining new fish for at least two weeks helps prevent the spread of infections into the new tank. Consider investing in a separate tank for this duration.
2 Easy Methods of Acclimating New Fish
Fish acclimation starts at the pet store or whichever source you are getting the fish from. It starts by paying attention to the original tank conditions and environment.
Make a note to avoid purchasing fish from a tank with dead animals, sick fish, or drastically varying ecosystems compared to yours. Acclimation is smoother and stress-free if the original environment of the fish does not differ vastly from its new environment.
Also, lighting conditions changes can shock the fish once it arrives in your home or even during transportation. Turn the aquarium lights off before acclimating the fish in your home. Keep them off until the next day to avoid shocking the new fish.
The best method for you will vary depending on the type of fish you have. For example, saltwater fish need more time to acclimate to a new environment than freshwater fish. This is because their bodies are more sensitive to certain changes.
1. Acclimation by Floating Method: Step by Step
Floating acclimation is the easiest, fastest, and cheapest way to acclimate fish into a new tank. This is also the most popular method that is recommended by many pet stores.
However, it does have some downsides. Floating acclimation accounts for temperature perfectly but is rather poor for sensitive animals that are easily affected by varying levels of pH and salinity.
These downsides are also the reasons why the process is best for freshwater aquatics and not sensitive saltwater animals like fish & shrimp. Follow these steps to properly acclimate the fish:
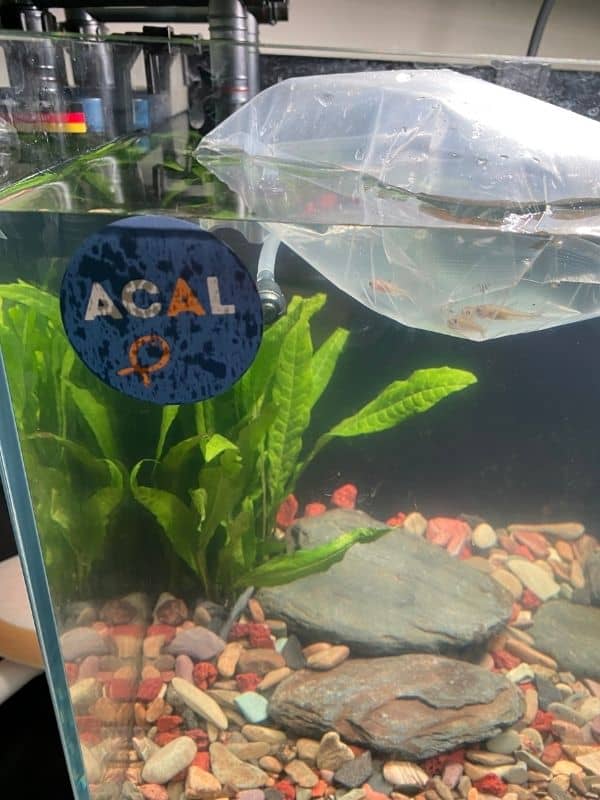
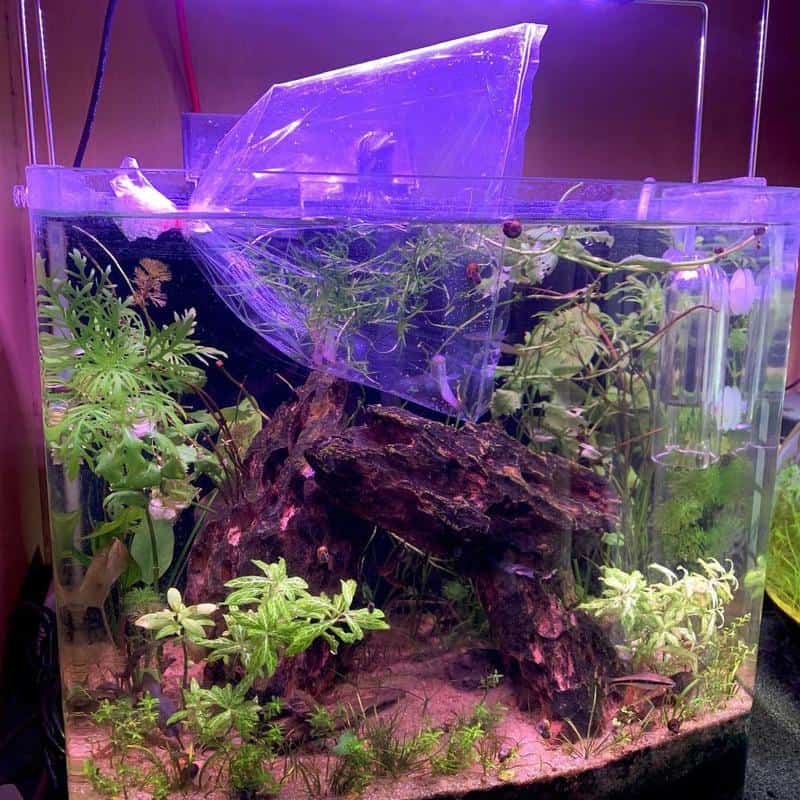
Step 1 – Float the Bag
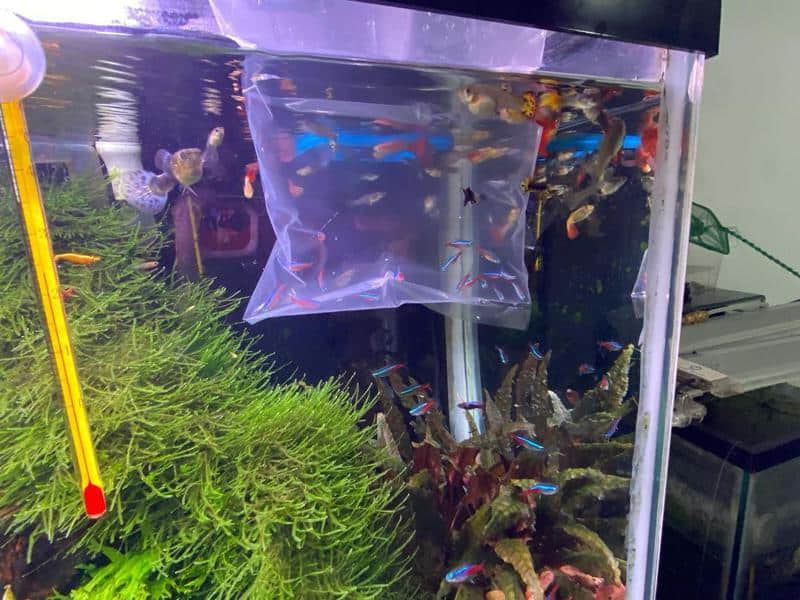
The method is called floating acclimation because it literally entails floating the transportation fish bag in the aquarium water.
Do not open it at first, some choose to, but a slow pace is always best. Keep the bag sealed and let it float in the tank for about 15 minutes.
Proceed to open the bag after 15 minutes. Roll the ends of the bag to create a thick edge that will prevent it from sinking.
If the bag can’t float (say the fish is frantically moving up and down, making it hard to stabilize the bag), then you can clamp it to the walls of the tank. Do not remove the bag from the water when opening it.
If you have a container instead of a bag, then the same process is applicable. Float the container in the aquarium water, ensuring it does not sink. Open the container after 15 minutes.
Step 2 – Start Acclimating
After opening the container, proceed to start acclimating the fish by taking half a cup of the aquarium water and pouring it into the bag.
Leave the bag floating for about 4-15 minutes.
This is a slow process, and you can vary the timing as you please. Allow the process to be slow so that the new fish can get acclimated swiftly to the changes in temperature, pH, salinity, nutrients, and oxygen levels.
Repeat the step after 4-15 minutes, and repeat it again at least three more times.
Water mixing in float acclimation helps mostly with equalizing the temperature of the two environments but also helps address other water parameters like pH and oxygen content.
Step 3 – Check for Water Parameters
Your aquarium won’t have the same water conditions as the original tank. Also, the water quality in the transportation bag changes along the way; the longer the fish stays in the bag, the more drastic the water quality changes.
On short trips, the pH is relatively stable, but the temperature changes. However, there are more drastic changes on longer trips that can affect the fish’s mortality.
A longer time in the bag means more oxygen depletion and more carbon dioxide accumulation. It also means waste excretion that increases ammonia. An increase in temperature increases metabolism in the fish, which in turn increases ammonia levels. All of these make for greater water changes to combat.
While going through step number two, ensure you are constantly checking the water parameters in both the bag and the tank.
Avoiding a pH shock is the highest priority since a small change in pH, even 0.5 to 1.0, can be lethal. A difference of 0.4 is okay, and many fish can thrive in such environments, but some species, like the Discus fish, are more susceptible to even the slightest shifts in their ideal pH environments.
Step 4 – Ensure Bag and Tank Water Qualities Are the Same
Continue adding the ½ cup water from the tank into the bag until the bag is full. Empty the bag halfway and proceed to do the step again about 4-5 times till the bag is full again. Check the water parameters using a water testing kit throughout this entire process.
Once you have noted that the water conditions are starting to become similar in the two environments, proceed to finish the acclimatization.
Step 5 – Introduce The New Fish Into the New Tank/Aquarium
Use a net to remove the fish from the bag and place it into the aquarium. Make note that you do not pour any of the water in the bag into the tank, only the fish.
And that is it; you have successfully acclimated to the new fish.
You can now dispose of the shipping bag contents in a sink, toilet, or another container.
2. Acclimation by The Drip Method: Step by Step
If you purchased a saltwater fish, then drip acclimation is the best method for you.
Drip Acclimation involves slowly introducing the fish to the new environment by gradually mixing the water in the bag or container with the aquarium water using a drip system.
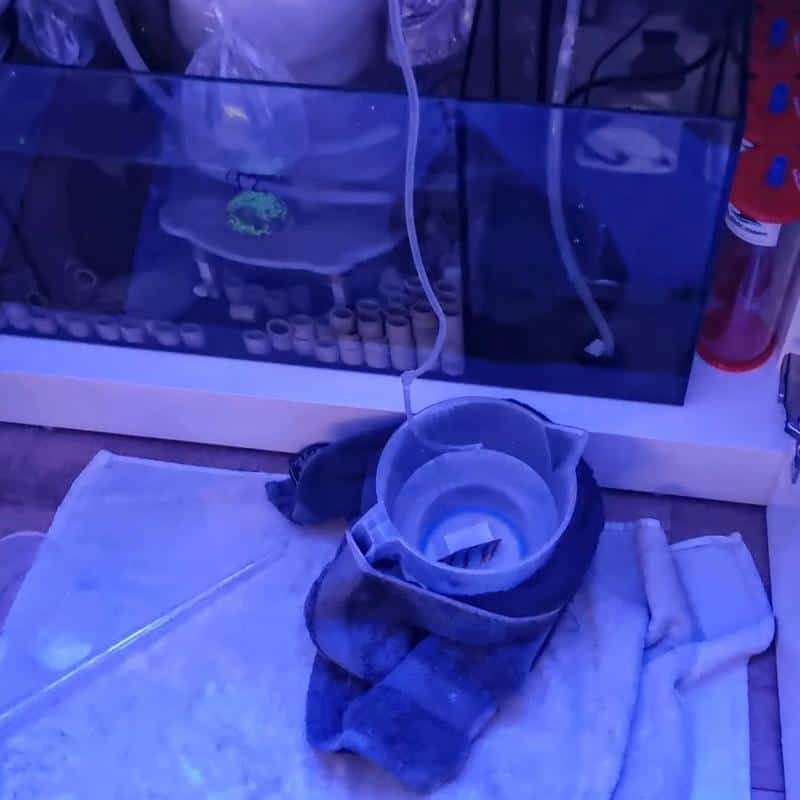
The drip system can be a siphon tube connecting the aquarium water with the shipping bag or a DIY cup with some of the aquarium tank water dripping into the bag.
For this process, we will need three supplies: airline tubing for siphoning water, a valve/tap fixture to control the water drip, and a separate bucket without any contaminants for the new fish & its bag water.
Here is a step-by-step guide on how to drip acclimate a new fish in an aquarium:
Step 1: Place the New Fish in The Container
Take the fish out of the bag and place it in a separate aquarium container. Ensure the container/bucket is not contaminated and is used for aquarium purposes. The container should also be big enough for the fish to swim around.
Place the bucket at a lower level, with your aquarium being on a higher platform for the siphoning process.
Step 2: Create the Siphoning Tube
This is a DIY part that you can improvise creatively depending on what you have.
For our supplies, proceed to connect the valve/tap-like fixture to the airline tubing. You want the valve to control the amount of water dripping through the tube. A good place to place it is right in the middle.
Test if it works by placing one end of the tube in the aquarium and sucking at the other end of the tube that will be placed in a separate container. Once the water starts to pour from the other end, proceed to turn the valve and note how slowly you can make the water drip; the slower, the better.
Once you have confirmed your siphon works, proceed to place the non-aquarium end of the siphon into the separate tank.
Step 3: Let Water Flow Through the Tubing While Adjusting the Drip
Adjust the rate of the drip as the water passes through the tubing. A slow rate is better since the advantage of the drip acclimation is a longer period of acclimation that ensures sensitive fish are slowly introduced to the aquarium environment.
Allow this to go on for an hour while checking for the water parameters in both environments. Adjust the rate of the drip depending on how the parameters change; always remember to maintain a slow drip. A rate of no more than 3 cups of water per hour is good.
Step 4: Stop the Process Once the Water Level Doubles
Stop the drip when the water in the container doubles its initial level. Check for the water qualities, if they match the aquarium then you have successfully completed the acclimation process. If not, proceed to continue the drip for the same length period.
Step 5: Add New Fish to The Aquarium
Finish the acclimation by using a net to transfer the new fish into the main aquarium. Make sure not to mix the container water with the tank water.
Drip acclimation can take anywhere from one hour to several, depending on the species and sensitivity of the fish.
Check out this video to learn how to create another practical drip acclimation DIY setup; all you need is a plastic cup, a small tube, and a separate container.
Tips & Precautions to Keep in Mind when Acclimating Fish
1. Monitor for Bullying After Acclimating
Monitoring for bullying can be considered a part of acclimation, too, since you get to see how different tank mates interact with the new fish.
Ensure you pay keen attention to the feeding habits, how they act around one another if the health of the fish is unaffected, and how normal their personalities are.
Do not hesitate to act at the first sign of bullying, health risks, or stress.
2. Cover the Shipping Container
If the fish in the transportation bag are erratically moving around, then you can help them calm down by covering the container with a cloth to create a dark environment for them. This helps ease the transportation stress.
3. Add only A Few Fish to The Aquarium at A Given Time
This reduces the bio load on the system and the excess task put on the biofilter. It also ensures there are enough beneficial bacteria to keep away high toxin levels created by the excess waste.
4. Do Not Use Air Stones or Bubblers in The Fish Bag.
Air stones/bubblers used to increase oxygen content in fish bags inevitably cause an increase in the pH levels and ammonia. Although positive, the bubbler eventually creates a toxic environment that affects the fish.
Read More:
Frequently Asked Questions
Should You Feed Fish After Acclimation?
It is not recommended to feed the fish immediately after acclimation. It is best to wait at least 24 hours before feeding the fish.
However, this is a rule of thumb to help you play it safe. If you notice the fish is well adjusted, hungry, and ready to feed, then you can give them food even about an hour after acclimation.
How Long Can Fish Survive in A Bag?
Fish can survive in a sealed bag for up to 9 hours, but some species can survive up to a few days. Fish need oxygen to live, but unlike humans, they do not get their oxygen from the air; they get it from dissolved oxygen in the water.
This means so long as there is water, the fish will take it through its mouth, pass it on to the gills, and absorb the dissolved oxygen from the water.
It would be best if you did not keep the fish in the bag for more than a few hours. Oxygen deprivation is not the only problem in a sealed bag since C02, pH, temperature, ammonia, nitrite, and nitrate levels are also affected, thereby creating a toxic environment for any fish to live in.
Conclusion
The two acclimation processes: drip and float acclimation, work for all types of aquatic life, from fish to invertebrates and plants. Fish acclimation is a crucial part of owning a fish.
Hobbyists need to be very careful in how they handle their fish during this stage as well as how they transport the fish from the store.